.png)
CCH ProSytem fx Tax
In this article
First Time Setup for CCH ProSystem fx Tax
- Open the return
- From Menu Bar, select G/L
- Click SETUP in dropdown
- A pop-up will appear, just click OK


- Go back to the Menu bar and select G/L again. This time click IMPORT
- A pop-up will appear. Select “Configure custom imports”. Click OK
- On the next pop-up, do the following:
- Name the custom import profile “Tallyfor”
- Use the browse button to locate the import file
- Make sure “Import file type” is set to “Delimited (data items separated by characters)
- Start import at row 1
- In the “Delimited files” section, select:
- Comma
- Tab
- Semicolon
- Click OK


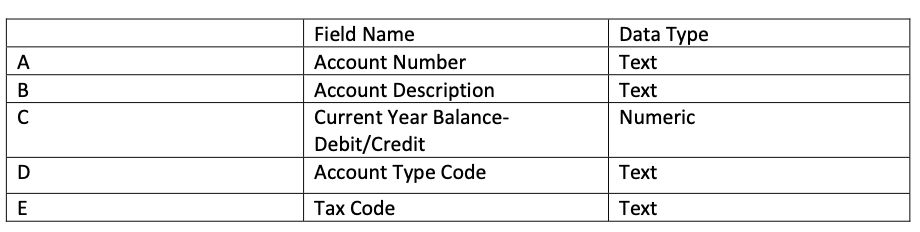
- On the next pop-up, complete the top table to match this:
- Click OK
- First time setup is complete
How to Import Tallyfor Data into CCH ProSystem fx Tax
- Go to G/L
- Select Import
- A pop-up will appear. Choose “Select a custom import”.
- Click OK.
- On the next pop-up,
- Browse for your Tallyfor tax file
- Under “Select custom import”, choose Tallyfor
- In the “Select import options” section, check the boxes for:
- Account Descriptions
- Tax Codes
- Account Types
- Click OK
- Another box will pop-up: “Import complete, update your G/L Direct data?”
- Click Yes (pop-ups will disappear)
- Click “Calculate”
- Go back to the G/L menu, select “Data Transfer >> G/L Data to tax return
- A pop-up will appear
- click OK
- A second pop-up will confirm “XX items were processed.”
- Click OK
- Click “Calculate”